
There are many reasons why you might want to back up, extract or archive your Facebook content. On a personal level, you may be preparing to leave the platform and want to ensure you don’t lose valuable photos, messages or other content. Additionally, backing up your data can be a crucial step if you suspect your account might be compromised by a scammer or taken over by unauthorized access. By having a copy of your account’s data, you can safeguard important information and recover more easily in case of an emergency.
In this article we cover the steps for you to do this on your own through the Facebook platform. Of course, you can use commercial tools such as: Cloud Analyzer (Cellebrite), Cloud Extractor (Oxygen Forensics), E3 Platform (Paraben Corporation), etc. Please note that doing this manually has it tricks that can make you stumble so, if you need help, you may want to consult an IT professional who has experience completing cloud extractions.
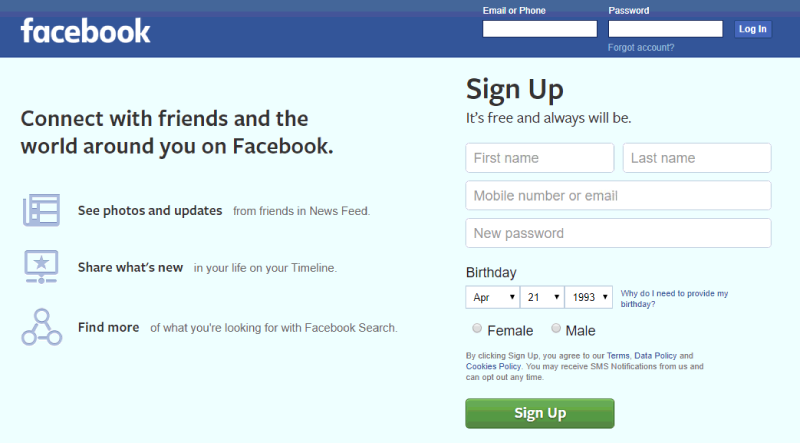
Step One: Log in to Your Facebook Account.
- Open your browser and go to the Facebook login page.
- Enter the Login and Password for the account you want to back up.
- Click the Log In button.
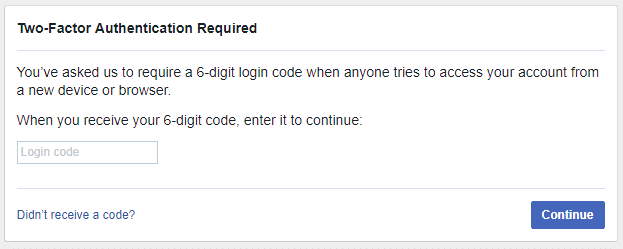
Step Two: Handle Two-Factor Authentication (If Enabled)
If you have previously enabled two-factor authentication on your Facebook account, take these steps to login:
- You will be prompted to enter a code sent to the trusted device of the account holder.
- Enter the code and click the Continue button.
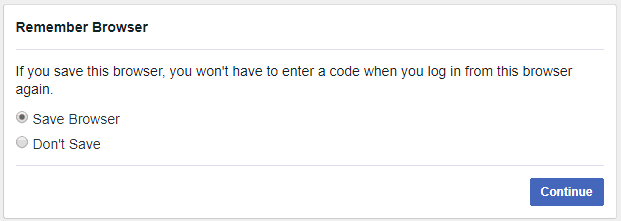
- In the next window, select Save Browser (optional) and click Continue.
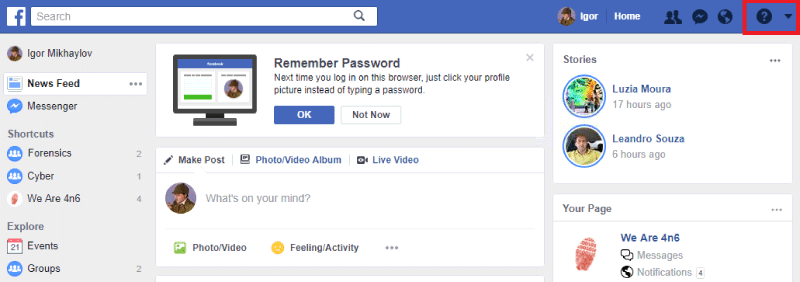
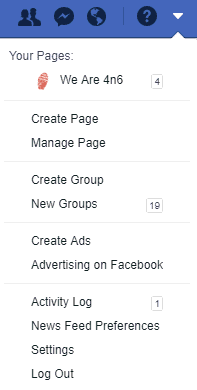
Step Three: Navigate to Account Settings
- Once logged in, click the triangle icon in the upper-right corner of the page.
- From the dropdown menu, select Settings.
- In the left-hand menu, click on Your Facebook Information (or a similarly labeled option, depending on Facebook’s current layout).
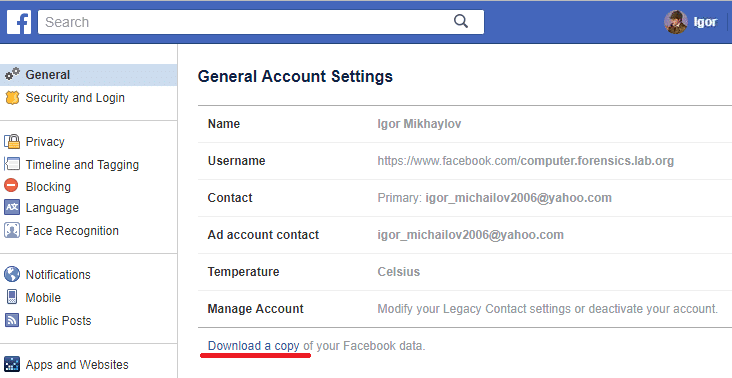
Step Four: Request a Download of Your Facebook Data
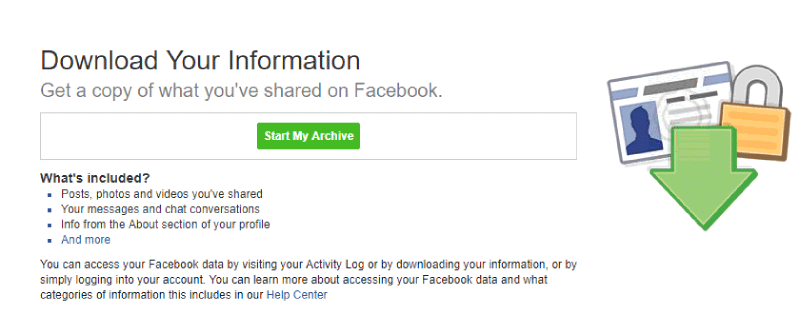
- Under the “Your Facebook Information” section, select Download Your Information.
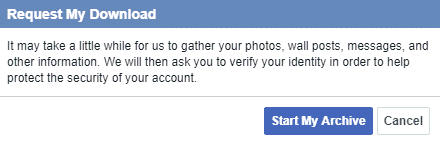
- Click the View or Create File button to customize your data request.
- Choose the following options based on your needs:
Date Range: Select “All Time” or a specific range.
Format: Choose either HTML for easier viewing or JSON for transferring to another service.
Media Quality: Select the quality of media files (High, Medium, or Low). - Check or uncheck specific data categories (e.g., posts, messages, photos) to tailor the archive to your preferences.
- Once finalized, click Create File.
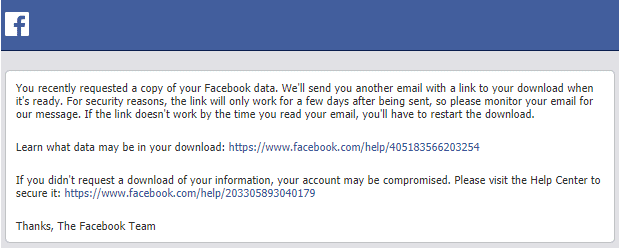
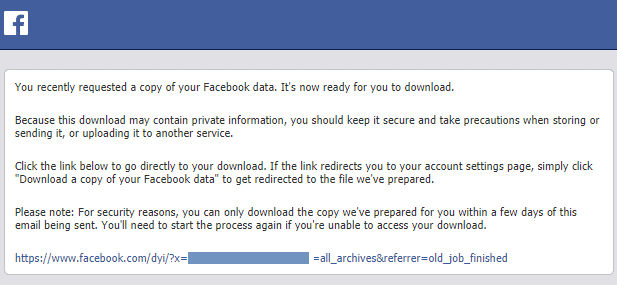
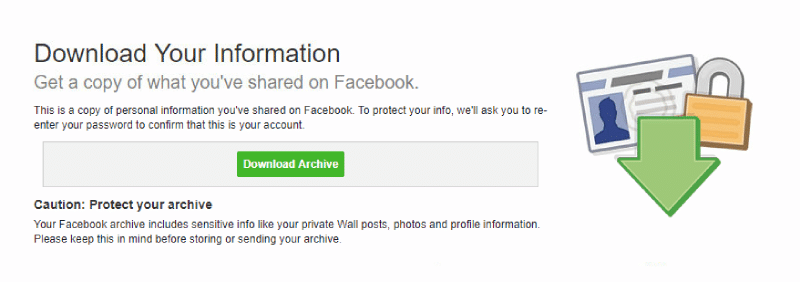
Step Five: Download Your Facebook Archive
- After requesting the file, you’ll receive an email notification when your data archive is ready to download.
- Open the email and click the provided link, or return to the Download Your Information page on Facebook.
- Click the Download button next to your archive.
- Re-enter the account password for verification and click Submit.
Step Six: Unpack and View the Data
- After downloading, locate the file (usually a .zip file) on your computer.
- Extract the contents of the archive.
- Open the index.htm file or navigate through the folders to view your data.


Conclusion
Whether you’re backing up your content, extracting important data, or archiving your Facebook account, this manual process ensures you have a copy of your information. While not designed for forensic investigations, it’s an effective way to safeguard your content or prepare your account for deletion. For advanced needs, commercial tools may be worth exploring, especially when API limitations or forensic requirements come into play.

About the authors
Oleg Skulkin, GCFA, MCFE, ACE, is a DFIR enthusional (enthusiast + professional), Windows Forensics Cookbook and Practical Mobile Forensics co-author.
Igor Mikhaylov, MCFE, EnCE, ACE, OSFCE, is a digital forensic examiner with more than 20 years of experience and Mobile Forensics Cookbook author.
DISCLAIMER: THIS POST IS FOR INFORMATIONAL PURPOSES ONLY AND IS NOT TO BE CONSIDERED LEGAL ADVICE ON ANY SUBJECT MATTER. DIGITAL FORENSICS CORP. IS NOT A LAWFIRM AND DOES NOT PROVIDE LEGAL ADVICE OR SERVICES. By viewing posts, the reader understands there is no attorney-client relationship, the post should not be used as a substitute for legal advice from a licensed professional attorney, and readers are urged to consult their own legal counsel on any specific legal questions concerning a specific situation.