Digital devices are an integral part of our lives. Therefore, digital evidence, namely, evidence obtained from various digital devices, is increasingly used in investigations in the corporation or law enforcement to uphold your cybersecurity.
What Is Digital Forensics?
Digital forensic investigation is the science of investigating electronic data. This branch of forensic investigation is an important part of the digital age. Digital forensics looks at the details that are often overlooked by the general population, where information is stored out of sight.
Forensic tools are used to analyze the hardware and software of devices and file systems to learn more about them. Items like hard disk drives store information that can be recovered. Metadata is stored within files and can lead an investigator to discover more about its origins.
A digital forensics expert will be able to perform data recovery from storage devices like hard disk drives, USB drives, and SSD drives. They can also dive into any common operating system like Windows, Linux, and MacOS to investigate software issues.
Through forensic analysis a digital forensics expert will be able to access data that others are unable to. Digital forensics in hard drive imaging is a method of copying another disk image with each bit copied over exactly.
This can include deleted files and unused space. Preserving the unseen details is a key component to investigating and is what makes forensic imaging important.
Copying over a hard drive allows an investigator to make an exact copy that can be used to investigate without damaging the original evidence. The investigator can then begin the process of seeing how files were accessed and when.
The precision at which a forensic image of a hard drive is made is crucial. A forensic image of a hard drive must meet very specific criteria in order to be used in a legal setting. The smallest of changes to the hard drive when it’s copied can alter the data in a way that would make it unacceptable as evidence in a court setting.
A feature of digital evidence is that it can be easily damaged or destroyed. Often, this happens unintentionally. For example, when technical staff try to restore a computer system after an incident. A typical carrier of digital evidence is a hard drive. Today we will consider: how to make the forensic image of the hard drive by example of making a copy of the hard drive of the laptop.
What Are Cyber Forensic Copies?
Types of cyber forensic copies:
Copy ‘drive-to-drive’
When acquiring like this, the data from the hard drive (digital source) is transferred to another one. If the destination drive has a larger size, then the unused drive space is filled with zeros.
Copy ‘drive to file’
When acquiring like this, the data from the hard drive (digital source) is transferred to a file located on another drive. This creates a sector-by-sector copy of the hard drive under study. Usually, this image has the format DD (RAW) or Encase (E01).
The DD format is a file containing a copy of the data of the examined hard drive and has a size corresponding to the size of the hard drive. However, often, the hard drive is not full of files, even half. Therefore, the use of DD files results in the purchase of a large number of hard drives to store the created files, which leads to additional financial costs. Most often, when creating forensic copies of hard drives, an Encase file is used.
In this case, the acquired data from the source drive is compressed (for example, in the case of forensic accounting, the file size – a forensic image of the hard drive of the accounting computer can be nine times smaller than the size of the source drive). Forensic copies in the Encase format can significantly save disk space on the computer of an incident investigation specialist or a computer forensics expert.
In addition to all of the above, the data in the Encase image is protected from change. This is achieved in the following way: for the first data block of this file, 64 KB in size, a hash is calculated, which is used to encrypt the next 64 KB block.
After that, for the last data block of 64 KB size, a new hash is calculated which is used to encrypt the next data block, etc. This method of data coding allows, in the subsequent, to confirm the integrity of data extracted from the source drive or to reveal the fact of making changes in the forensic image.
In case of detection of the fact of making changes, the compromised part of the data can be localized and excluded from the study. At the same time, other parts of the forensic image will be available for research and will not lose its evidentiary value.
Extracting the hard drive.
For our example, we will consider creating a forensic image of the FUJITSU SIEMENS Amilo M3438G hard drive.

Fig. 1. Appearance of the laptop.
Extracting the hard drive from the laptop can present certain difficulties. That’s why we recommend that you first find on the “Internet” network a video that shows how to disassemble a particular laptop model so as not to damage it. Usually, such a video can be found on request: “How to disassemble ‘laptop model.’”

Fig. 2. The results of the search query “How to disassemble M3438G”.
Typically, the laptop model is indicated on the label located on the bottom of the laptop or in the battery compartment. When you remove the hard drive from the laptop, remember that there can be more than one hard drive in the laptop. There are models in which four hard drives are installed. Furthermore, an additional hard drive may be installed into the compartment DVD-drive. We are lucky. Only one hard drive is installed in our laptop.

Fig. 3. Ejected hard drive.
Creating the forensic image of the hard drive.
When creating forensic images of media, used hardware or software recording blockers. This is done in order to exclude the possibility of accidental modification of forensic data.
We will use the hardware lock WiebeTECH Forensic UltraDock V5. This blocker emulates the functions of writing, moving, deleting files on a connected hard drive for proper operation in a Windows environment. In this case, in fact, no data on the source drive is changed.

Fig. 4. Appearance of the write blocker.
This blocker has the following advantages over others:
- It automatically detects and unlocks hard drive areas such as ‘Device Configuration Overlay’ (DCO) and ‘Host Protected Area’ (HPA).
- If access to hard drive data is blocked by an ATA password, it displays relevant information on its display.
To this blocker, you can connect hard drives with SATA and IDE interfaces. If your laptop uses SSD hard drives, you will need an appropriate adapter to connect it.

Fig. 5. Adapters for SSD drives.
We will use the program “Belkasoft Acquisition Tool” to create a forensic image. This imaging tool is free. It is necessary to go to the address: http://belkasoft.com/get and fill in a short form for its receipt. “Belkasoft Acquisition Tool” is a universal utility that allows you to create forensic images of hard drives, mobile devices, extract data from cloud storages.
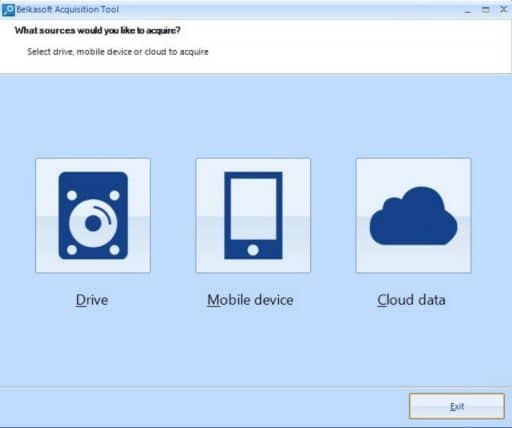
We connect the extracted hard drive, using the write blocker to our computer and run the “Belkasoft Acquisition Tool”. We will see the main window of the program where we will be asked to choose the data source: hard drive, mobile device or cloud storage.

Fig. 6. The main window of Belkasoft Acquisition Tool.
Click on the ‘Drive’. After that, a window will open, in which we will be asked to choose: the device to be copied; specify the place where the forensic image will be created; specify file name and format, etc.

Fig. 7. A window for selecting a drive to create its forensic image and setting its parameters (location, name, format, etc.).
As you can see on Fig. 7, the hard drive, the forensic image of which we will create, is connected as ‘PHYSICALDRIVE2’. We will create a file named ‘image.E01’, for which we calculate checksum SHA-1 and MD5.
Calculation checksum is necessary in order to confirm the authenticity of the forensic image from the time it was created to the time of using evidence obtained from it. After that, you need to click on the ‘Next’, which will start the process of creating a forensic image of the hard drive.

Fig. 8. Display the process of creating a forensic image of the hard drive.
In the end, we get the file ‘image.E01’, which contains a forensic image of the hard drive.
Conclusion.
In this article, we looked at the process of creating a forensic image of a hard drive, using the example of a hard drive extracted from the laptop. They learned about: what methods are used to extract a hard drive from the laptop; what hardware devices are used to connect hard drive, when creating forensic images of hard drives. We thoroughly acquainted with the process of creating a forensic image of the hard drive.
Authors:


Comments are closed.